Intel® VTune™ Amplifier for Systems can collect and analyze performance data on embedded Linux* devices running Wind River* Linux*. This topic provides an example of setting up Intel VTune Amplifier for Systems to collect performance data on an embedded device with Wind River Linux installed using the Intel System Studio integration layer provided with the product installation files. The process integrates the VTune Amplifier product drivers with the target package and includes them in the embedded device image. Root access to the kernel is required.
Install the Intel System Studio with the Integration Layer
Prerequisite: Wind River Linux is already installed on the same system on which Intel System Studio will be installed.
During the Intel System Studio installation, the installer displays an option for integration with Wind River Linux. Select the checkbox and browse to the location where Wind River Linux is installed. The integration will be done automatically with your Wind River Linux on your host system as Intel System Studio is installed.
Note
If you do not have Wind River Linux installed on the host machine, you can ignore the automatic integration during the installation. You can run the integration manually after you have Wind River Linux installed. Refer to the instructions available from this article: https://software.intel.com/en-us/articles/using-intel-system-studio-with-wind-river-linux-build-environment.
Configure the Intel VTune Amplifier Package for the Target System
Select File > New > Wind River Linux Platform Project from the Wind River Linux Workbench.

- Select Platform from the Build type drop-down list and click Next.
Give your project a unique name and click Finish.
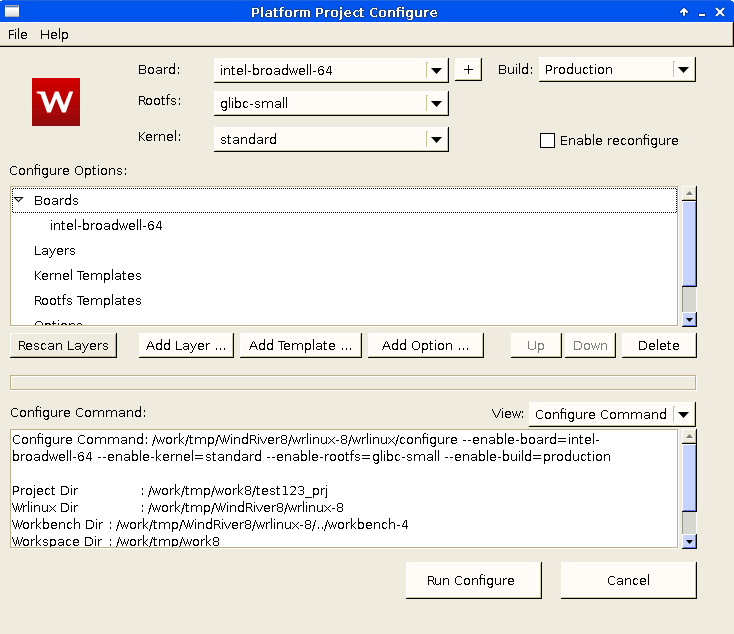
The Platform Project Configure window opens.

- Select the appropriate board type from the Board drop-down list.
Click Add Layer... and browse to the Intel System Studio integration layer, which is located in <WIND_HOME>/wr-iss-<version>. Click Add to close the window and add the layer to the configuration.

- Click Rescan Layers on the Platform Project Configure window.
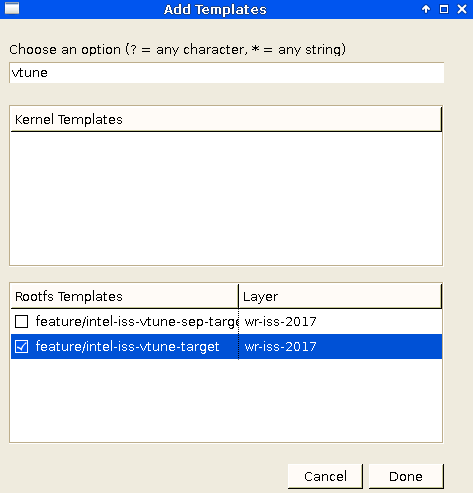
When the scan is finished, click Add Template.... The Add Templates window appears.

Select the appropriate Intel VTune Amplifier template and click Done. Only one template can be selected.
- Select intel-iss-vtune-target to support remote data collection from the host system to the target system.
- Select intel-iss-vtune-sep-target to support native data collection using the sampling enabling driver command line utility.
Tip
Type "vtune" at the top of the Add Templates window to filter the list of templates.
- Click Run Configure to execute the configure command.
- Click Finish to complete the setup.
Note
If you have an existing Wind River Linux Platform Project, you can add the Intel VTune Amplifier features manually. Refer to the instructions available from this article: https://software.intel.com/en-us/articles/using-intel-system-studio-with-wind-river-linux-build-environment.
Build and Boot the Target System
The VTune Amplifier drivers are built automatically and integrated with your target system image. The VTune Amplifier components are available from the /opt/intel/ directory on the target system.
Configure and Run Remote Analysis
Use the following steps on the host system to set up and launch the analysis on the embedded device. These steps assume the intel-iss-vtune-target template was selected.
Set up a password-less SSH access to the target using RSA keys.
Select the remote Linux (SSH) analysis target and specify the collection details.
Start the analysis.
For more information, see Collecting data remotely from the VTune Amplifier GUI.
Tip
You can also launch the performance analysis directly from Wind River Linux Workbench. Select Intel System Studio > Intel VTune Amplifier > Launch VTune Amplifier to open the VTune Amplifier GUI. A product icon is also available from the Workbench toolbar.
