To get started with the VTune Amplifier, choose the version of the product you are using:
Explore the key features provided with both versions of the VTune Amplifier across different platforms.
Note
Instructions provided below for the Linux* host are also applicable to the VTune Amplifier for macOS* host but for remote analysis targets only. Local target analysis on macOS is not supported. By default, the VTune Amplifier for macOS is installed at /Applications/Intel VTune Amplifier XE 2017 .app.
Get Started with the VTune Amplifier XE:
Prerequisites
For hardware event-based sampling analysis, make sure you have the sampling driver installedsampling driver installed.
For remote analysis, set up your remote Linux target systemset up your remote Linux target system.
For system requirements, see the product Release NotesRelease Notes.
Step 1: Start the VTune Amplifier
Set up the environment variables:
csh/tcsh users: source <install_dir>/amplxe-vars.csh
bash users: source <install_dir>/amplxe-vars.sh
For root users: /opt/intel/vtune_amplifier_xe_2017
For non-root users: $HOME/intel/vtune_amplifier_xe_2017
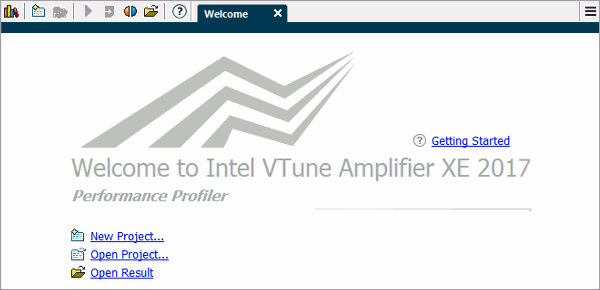
- Launch the VTune Amplifier:
For standalone GUI interface, run the amplxe-gui command.
For command line interface, run the amplxe-cl command.
Step 2: Set Up the Analysis Target
Build your target application in the Release mode with all optimizations enabled.
Create a VTune Amplifier project:
Click the
 menu button in the right
corner and go to
New > Project... .
menu button in the right
corner and go to
New > Project... .
Specify the project name and location in the Create Project dialog box.
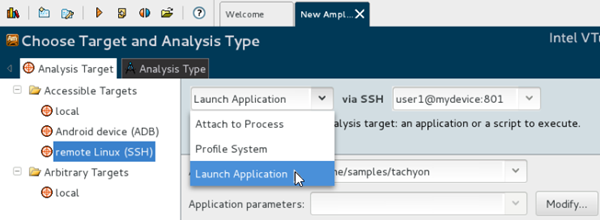
In the Analysis Target tab, select a target system from the left pane and select an analysis target type from the right pane.
Configure your target: application location, parameters, and search directories (if required).
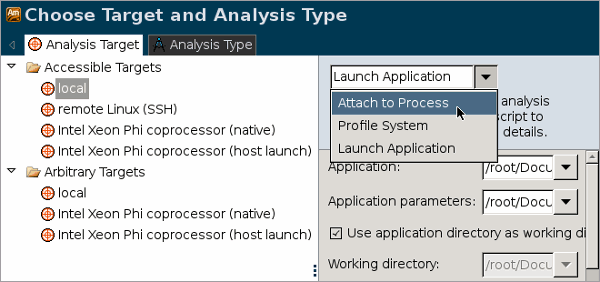
NEW: Select Arbitrary Targets to analyze a target that is not currently accessible from this host system. You can select a hardware platform and operating system from the list, create a command line analysis configuration, save it to the buffer, and run it later on the intended host. For more information, see Analysis Target Setup.For more information, see Analysis Target Setup.
Step 3: Configure Analysis
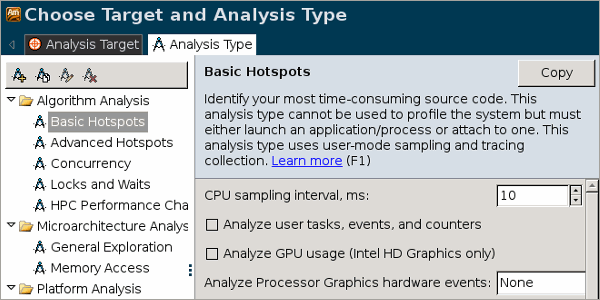
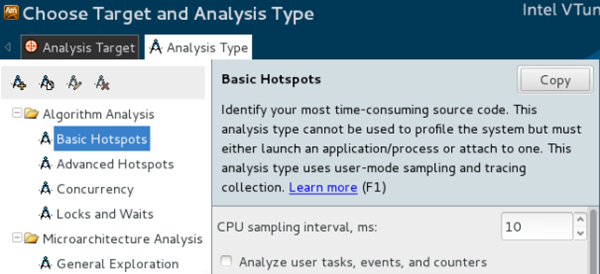
Switch to the Analysis Type tab.
From the left pane, select an analysis type applicable to your platform and configure analysis options in the right pane.
Click the Start button on the right to launch the analysis.
Step 4: View and Analyze Performance Data
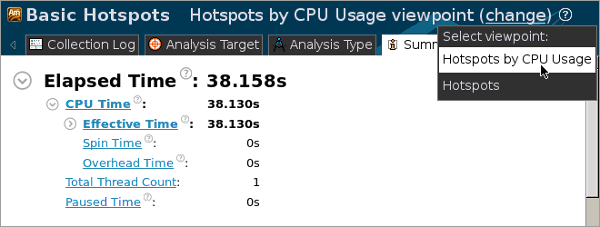
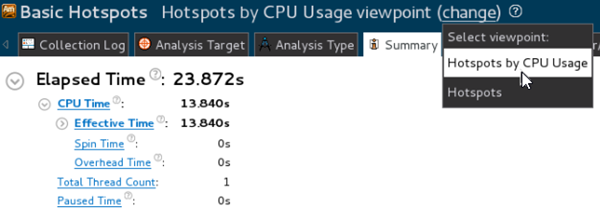
When data collection completes, the VTune Amplifier opens the result in the default viewpoint, which is a preset configuration of windows for an analysis result. You may switch between different viewpoint to analyze the data from different perspectives using different sets of performance metrics.
Start your analysis with the Summary window to get an overview of the application performance and then switch to other windows to explore the performance deeper at the granularity of function, source line and so on.
Get Started with VTune Amplifier for Systems:
Get Started with Performance Analysis
Step 1: Start the VTune Amplifier
Set up the environment variables:
csh/tcsh users: source <install_dir>/amplxe-vars.csh
bash users: source <install_dir>/amplxe-vars.sh
By default, the <install_dir> is:
For root users: /opt/intel/system_studio_<version>/vtune_amplifier_for_systems
For non-root users: $HOME/intel/system_studio_<version>/vtune_amplifier_for_systems
Launch the VTune Amplifier:
For standalone GUI interface, run the amplxe-gui command.
For command line interface, run the amplxe-cl command.
Step 2: Set Up the Analysis Target
Build your target application in the Release mode with all optimizations enabled.
- Create a VTune Amplifier project:
Click the
menu button in the
right corner and go to New > Project... .
Specify the project name and location in the Create Project dialog box.
In the Analysis Target tab, select a target system from the left pane and select an analysis target type from the right pane.
Configure your target: application location, parameters and search directories (if required).
NEW: Select Arbitrary Targets to analyze a target that is not currently accessible from this host system. You can select a hardware platform and operating system from the list, create a command line analysis configuration, save it to the buffer, and run it later on the intended host. For more information, see Analysis Target Setup.For more information, see Analysis Target Setup.
Step 3: Configure Analysis
Switch to the Analysis Type tab.
From the left pane, select an analysis type applicable to your platform and configure analysis options in the right pane.
Click the Start button on the right to launch the analysis.
Step 4: View and Analyze Performance Data
When data collection completes, the VTune Amplifier opens the result in the default viewpoint, which is a preset configuration of windows for an analysis result. You may switch between different viewpoints to analyze the data from different perspectives using different sets of performance metrics.
Start your analysis with the Summary window to get an overview of the application performance and then switch to other windows to explore the performance deeper at the granularity of function, source line and so on.
Get Started with Energy Analysis
Depending on your target system, the VTune Amplifier uses different collectors for energy and power analysiscollectors for energy and power analysis.
Android* Targets:
- Connect to the target Android system via an adb shell command.
Load device drivers and install the Intel SoC Watch collector on the target Android systemLoad device drivers and install the Intel SoC Watch collector on the target Android system.
Run the data collection on the targetRun the data collection on the target. For example:
>./socwatch -t 60 -f cpu-cstate -m -r vtune -o ./results/test
where: -t 60 specifies collection duration in seconds, -f cpu-cstate enables C-state and wakeups analysis, -m specifies the maximum level of detail, and -r vtune creates a *.pwr file that can be imported into VTune Amplifier. The analysis result *.pwr file will be located in the ./results/test directory.
Copy the result file (*.pwr) to the host.
Open/create a VTune Amplifier project and click the
 Import toolbar button to import the energy analysis result
file into the project.
Import toolbar button to import the energy analysis result
file into the project.
Explore the Platform Power Analysis viewpoint to view the collected dataview the collected data.
Linux* Targets:
Load device drivers and install the Intel SoC Watch collector on the target Linux systemLoad device drivers and install the Intel SoC Watch collector on the target Linux system.
Run the data collection on the target. For example:
>./socwatch -t 60 -f cpu-cstate -m -r vtune -o ./results/test
where: -t 60 specifies collection duration in seconds, -f cpu-cstate enables C-state and wakeups analysis, -m specifies the maximum level of detail, and -r vtune creates a *.pwr file that can be imported into VTune Amplifier. The analysis result *.pwr file will be located in the ./results/test directory.
Copy the result file (*.pwr) to the host.
Open/create a VTune Amplifier project and click the
Import toolbar button to import the energy analysis result
file into the project.
Explore the Platform Power Analysis viewpoint to view the collected dataview the collected data.